Saturday, December 26, 2009

Christmas Cookies

I was only able to make a couple different kinds of Christmas cookies this year; it's been a crazy few weeks. I love making cookies throughout the year but Christmas cookies are that much more fun.


The first kind I made was gingerbread men . This is a repeat of a recipe I made a couple years ago for Christmas. The thing I love best about them is that you can poke a hole in it, string it with ribbon and hang it on your tree. Gingerbread is super durable and will last for weeks as a sweet smelling, super cute ornament.

My gingerbread army.

The only other kind I was able to make this year was my white chocolate cherry shortbread cookies. I changed up the colors to make them a bit more festive. Yum.
What cookies did you make for your holiday this year?


Thursday, December 10, 2009

Festive Pinwheel Cookies!

A little while back I bought a bag of fresh cranberries. I was very excited to try to do something with them (other than decorate). This is one of my trials.

Cranberry-Orange Pinwheels
From BH&G's The Ultimate Cookie Book
1 cup cranberries
1 cup pecans
1/4 cup packed brown sugar
1 cup butter, softened
1 1/2 cups granulated sugar
1/2 tsp baking powder
1/2 tsp salt
2 eggs
2 tsp finely shredded orange peel
3 cups all-purpose flour

  1. For filling, in a blender or food processor combine cranberries, pecans, and brown sugar. Cover and blend or process until cranberries and nuts are very finely chopped. Set aside.
  2. In a large mixing bowl beat butter with an electric mixer on medium to high speed for 30 seconds. Add granulated sugar, baking powder, and salt. Beat until combined, scraping sides of bowl occasionally. Beat in eggs and orange peel until combined. Beat in as much of the flour as you can. Stir in any remaining flour. Divide dough in half. Cover and chill dough 1 hour or until easy to handle.
  3. Roll half of the dough between two pieces of waxed paper into a 10-inch square. Spread half of the filling over square, leaving a 1/2-inch border along the edges. Roll up dough. Moisten edges and pinch to seal. Wrap log in plastic wrap or waxed paper. Repeat with remaining dough and filling. Chill about 4 hours or until firm.
  4. Preheat oven to 375F. Using a sharp knife, cut rolls into 1/4-inch slices. Place slices 2 inches apart on an ungreased cookie sheet. Bake for 8 to 10 minutes or until edges are firm and bottoms are light brown. Let stand for 1 minute on cookie sheet. Transfer to a wire rack and let cool.

Makes about 60 cookies.

The ingredients.

The creamed sugar with eggs and orange peel. That's a lot of orange peel... and it smells good.

The chopped up cranberry mix. It's so red and pretty.

The rolled-out dough. From my previous failed attempts (or at least very difficult attempts) at rolling out cookie dough I've learned that having the dough cold enough is very important. I usually get impatient and try to rush into rolling before the dough is thoroughly chilled. That is a big mistake. It will only result in dough that sticks to everything you don't want it to. And if you have to roll up the dough like this for a pinwheel, you might as well forget it; the dough will fall apart and be completely unmanageable if it's too warm. Patience is the key.

I've mentioned my inability to divide things evenly many times before. This time I thought I'd measure things out so I'd get the two logs even. While it was a good thought, I still ended up with one of the logs having noticeably more filling. I'm not sure how it happened but I guess I'm gifted that way.

That is some very pretty filling!

Log. After getting it all rolled up, I wasn't real sure what to do with the ends that didn't have filling. I finally just decided to fold it in like a package.

Slices. If you look closely you'll notice that this sheet of cookies came from the log with less filling; the next shot shows a cookie from the other log. I guess that gives people options.

The final product: yummy, festive cookies. The dough is light and has a wonderful citrus flavor. The filling is sweet and a little nutty and completely delicious. The pairing make for a sweet and spunky holiday treat.

Sunday, December 6, 2009

Chili

Food allergies have been a blessing as well as a curse. Since I've had to make more than meal for everyone in our family, I've gotten the chance to try some recipes for myself that I've had to avoid for my family as a whole... like chili. Chili was kind of a staple of my diet growing up; my mom would always make it for the very first cold snap every year (and then frequently throughout the fall and winter). I've never gotten a chance to make for myself though because my husband doesn't like it. Crazy, right? He says it's something about the beans. Whatever. I've forgiven him... especially since he's so willing to try just about anything else. I feel really behind though. People are so particular about their chili and I've never even tried one recipe let alone found the perfect one. I guess everyone's got to start somewhere.

Chili
from Better Homes & Gardens
12 oz lean ground beef
1 cup chopped onion
1/2 cup chopped green sweet pepper
2 cloves garlic, minced
1 15-oz can dark red kidney beans, rinsed and drained
1 14.5-oz can diced tomatoes, undrained
1 8-oz can tomato sauce
2-3 tsp chili powder
1/2 tsp dried basil, crushed

  1. In a large saucepan cook ground beef, onion, sweet pepper, and garlic until meat is brown and onion is tender; drain fat. Stir in kidney beans, undrained tomatoes, tomato sauce, chili powder, basil, and 1/4 tsp black pepper. Bring to boiling; reduce heat. Simmer, covered, for 20 minutes.

Makes 4 servings (about 5 cups)

I forgot to take the ingredients picture so we'll just jump straight in. Here is the meat and vegetables cooking. I don't remember my mom putting peppers in her chili but they sound good. (I wasn't very attentive to my mom's cooking growing up though so I could be wrong.)

Adding the tomatoes, sauce, and spices.

Almost ready for simmering.

It only simmers for 20 minutes. That speed probably comes in handy sometimes but it seems like of quick to me.

The final product: good? The jury is still out on this one. The basil and garlic gives this chili a bit of an Italian flare and I haven't decided how I feel about that. I definitely liked the peppers and the overall chunkiness of it was good. And like most soups and stews the flavors meshed together to make this even better the next day. I'm wondering if you could achieve some of that effect by simmering this a bit longer. Overall, it definitely was a unique take on chili and I wouldn't say I didn't like it. It may just take another trial of it for me to straighten this out.
So what are your chili likes and dislikes? Do you have any recipes (or even just good key ingredients) that you'd be willing to share with this chili novice?

Wednesday, December 2, 2009

Coffee Companion

My in-laws like coffee... a lot. So I thought I'd bring something to our Thanksgiving celebration that goes well with coffee. And since I love all things sweet and most things toffee this version seemed like a good candidate.

Chocolate-Toffee Biscotti
From The Ultimate Cookie Book by Better Homes and Gardens

1/4 cup butter, softened
1/2 cup granulated sugar
1/2 cup packed brown sugar
2 1/2 tsp baking powder
1/8 tsp salt
3 eggs
1 tsp vanilla
2 3/4 cups all-purpose flour
1/2 cup almond toffee pieces
1/3 cup miniature semisweet chocolate pieces
6 oz semisweet chocolate, chopped
4 tsp shortening
Almond toffee pieces (optional)
  1. Preheat oven to 350F. Grease a cookie sheet; set aside. In a large mixing bowl beat butter with an electric mixer on medium to high speed for 30 seconds. Add granulated sugar, brown sugar, baking powder, and salt. Beat until combined, scraping sides of bowl occasionally. Beat in eggs and vanilla until combined. Beat in as much of the flour as you can with the mixer. Stir in any remaining flour. Stir in the 1/2 cup toffee pieces and the chocolate pieces.
  2. Divide dough in half (dough will be sticky). Using floured hands, on a lightly floured surface, shape each half of dough into an 8-inch-long loaf. Place loaves about 5 inches apart on the prepared cookie sheet.
  3. Bake about 25 minutes or until golden brown and firm to the touch in the center. Transfer to a wire rack and let stand for 1 hour.
  4. Reduce oven temperature to 325F. Transfer loaves to a cutting board. Using a serrated knife, cut loaves diagonally into 1/2-inch slices. (Or cool completely; wrap and store overnight at room temperature before slicing.) Place slices, cut side down, on the cookie sheet. Bake for 8 minutes. Turn slices over. Bake for 8 to 10 minutes more or until dry. Transfer to a wire rack and let cool.
  5. In a small saucepan heat and stir the chocolate and shortening over low heat until smooth. Dip one end of each cookie into melted chocolate mixture. Place on a sheet of waxed paper. If desired, sprinkle with additional almond toffee pieces. Let stand until chocolate is set.

Makes about 30 cookies.


The ingredients.

The completed dough.

The loaves of dough ready to go in the oven.

As you can tell I didn't get the dough split evenly so one loaf baked up larger than the other. I found this kind of annoying because I really strived for equality this time. Looking on the bright side though, this resulting in a wide variety of sizes in the cookies so people had lots of options to choose from. And who doesn't like options?

I let the loaves cool completely before I cut. I'd like to think it helped to keep the cookies from crumbling during the cutting process but I don't have a lot of evidence to support this theory. I know the one other time I've made biscotti I didn't wait and I had a lot of trouble keeping the slices together.

Aren't the slices so pretty?! Here they are all lined up to cool after the second baking.

Dipping anything in chocolate makes it better in my book. The biscotti is no exception. On a related note, playing with melted chocolate is very fun; the world would be a much better place if everyone worked with this liquid wonder more often!

Sprinkling with toffee pieces. I didn't really find a stellar technique for this. I dropped the toffee pieces on the chocolate right after dunking and since the chocolate was still pretty runny, the toffee would sometimes just slide right off. I guess I could have waited a few minutes and sprinkled the toffee on after the chocolate had set up a little but this seemed dangerous to me. What if I had waited too long and the chocolate was already set enough that the pieces just fell off? And then I'd end up wasting more toffee because I wouldn't be able to catch the run off pieces in a bowl. Any suggestions on the best way to sprinkle?

The final product: gold star! Crunchy and chewy and delicious. They are definitely dunkable but not so dry that they need to be. The chocolate and toffee combination is always great and the different incantations between the pieces in the dough and coating kept things interesting. The chocolate and toffee coating was very impressive and while not all that difficult, really made them look professional. This would be great for a coffee night or even a gift for a coffee-lover.

Saturday, November 28, 2009

Allergies and Dessert

My son is getting tested for food allergies. While I don't like the idea of him having allergies, I am thrilled with the thought that we might finally find the reason for all his itching and rashiness. Until we get the test results back, I've had to take him off all the most popular allergens: wheat, dairy, egg, nuts, and fish. It wouldn't be that difficult since he's currently only eating baby food and cereal but I'm still a nursing momma so I have to adjust my diet as well. Uh oh. Let's just say I don't diet well. If I'm trying to lose weight I have to add exercise because I stink at cutting back or taking things out of my diet. Just can't do it. Maybe I'm a bit of an emotional eater or maybe I just like my cereal and desserts too much but it's a characteristic I've come to terms with in myself.

In adjusting to this temporary character-building experience, I went in search of a dessert I could eat. They proved difficult since almost all desserts involve flour, butter or cream. Luckily about that time, Hannah from honey & jam posted just the thing: homemade apple sauce. Simple and yummy and delightfully free of wheat, dairy, nuts, and egg (and of course fish). Hooray!!

Spiced Slow Cooker Applesauce
by honey & jam
8 apples, peeled, cored, thinly sliced
1/2 cup water
3/4 cup packed brown sugar
1/2 tsp cinnamon
Pinch of nutmeg

Combine apples and water in crockpot and cook on Low setting for 4 to 6 hours. Stir in sugar, cinnamon and nutmeg; continue cooking for another 30 minutes.

The ingredients.

Peeled apples.

Crockpot full of wonderfully sweet apples.

Just to prove you don't need any special tools to peel and slice apples, I did it all with only these tools. Not really. I just don't have any of those super fun gadgets. If I was really cool like my mom, all I would have needed was one little knife. She's got all sorts of crazy awesome farm girl skills like that. Kudos to you, Mommy-O.

After about 5 hours, I added the sweet and spicy magic to the crockpot. I had a couple of other pictures of this step but they all included my husband's nose. This pot smelled awesome so it was hard to keep our noses away.

Spiced apples.

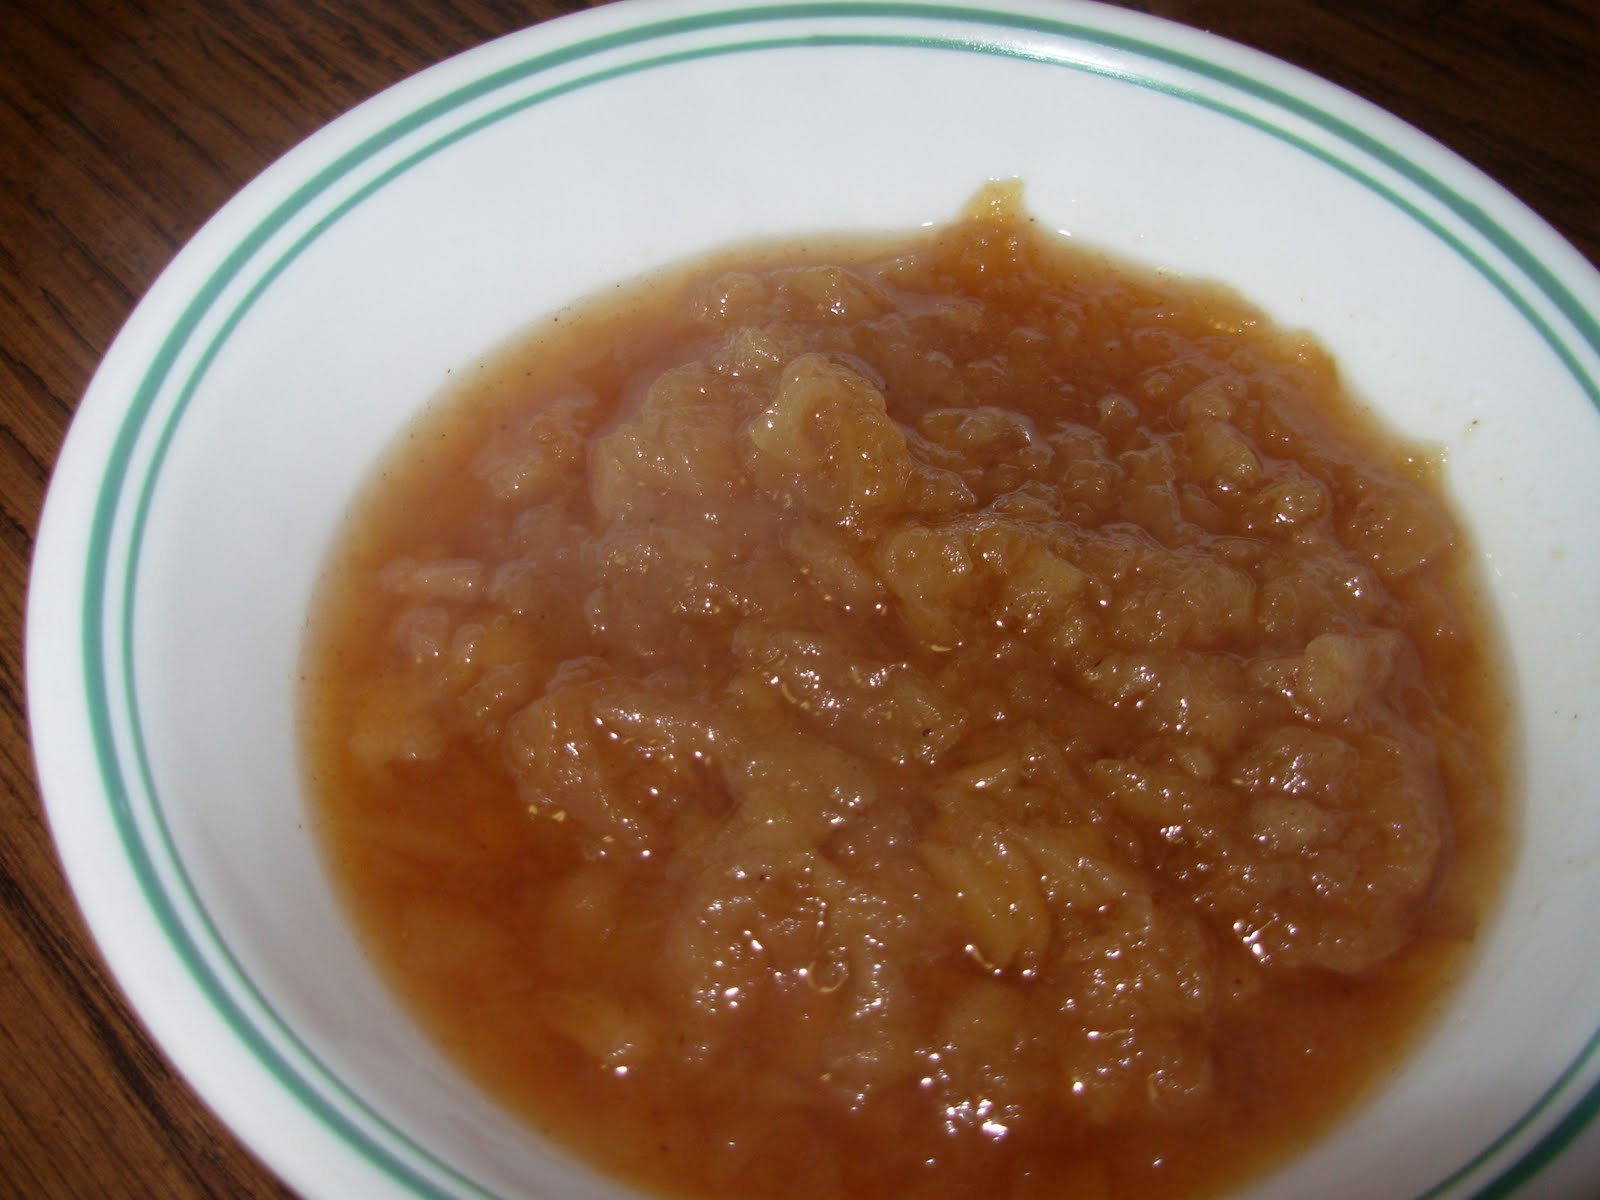
Seeing that it was still pretty chunky, I tried to mash the cooked apples up with a potato masher. While it was fun, it wasn't really all that effective. I didn't mind the bigger chunks of apple; if you fancy a finer fare (that's for you Tyler) you would probably want to cut your apples thinner than I did so they mash better.

The final product: awesome!! This was absolutely delicious and I'm not just saying that because it's the only really sweet thing I've eaten in a while. It's a big, warm bowl of comfort but I'm sure it would be just as good cold. I even took Hannah's suggestion and mixed it in with my oatmeal the next morning. Incredible. This is already on my list of favorite recipes and I know I'll be making this for years.

Tuesday, November 24, 2009

First Try at Muffins

Cranberry Muffins
From Better Homes and Gardens

1 3/4 cups all-purpose flour
1/3 cup + 2Tbsp sugar
2 tsp baking powder
1/4 tsp salt
1 beaten egg
3/4 cup milk
1/4 cup cooking oil
1 cup coarsely chopped cranberries
  1. Grease twelve muffin cups or the line with paper bake cups; set aside.
  2. In a medium bowl combine flour, 1/3 cup of the sugar, baking powder, and salt. Make a well in the center of flour mixture; set aside.
  3. In another bowl combine egg, milk, and oil. Add egg mixture all at once to flour mixture. Stir just until moistened. Combine cranberries and 2 Tbsp of the sugar; fold into batter.
  4. Spoon batter into prepared muffin cups, filling each two-thirds full. If desired sprinkle Streusel Topping over muffin batter in cups. Bake in a 400F oven for 18 to 20 minutes or until golden and a wooden toothpick inserted in centers comes out clean. Cool in muffin cups on a wire rack for 5 minutes. Remove for muffin cups; serve warm.

Streusel Topping

Combine 3 Tbsp all-purpose flour, 3 Tbsp brown sugar, and 1/4 tsp ground cinnamon. Cut in 2 Tbsp butter until mixture resembles coarse crumbs. Stir in 2 Tbsp chopped nuts.

Makes 12 muffins.

The final product: this was my first time making muffins that didn't involve cutting open a package. It really wasn't that much more difficult or even time consuming. The most difficult part was probably keeping the cranberries on the cutting board while cutting them; they kept wanting to shoot off the side if I hit one square on. The resulting muffins tasted pretty good. They weren't too sweet and had just enough tartness from the cranberries to keep your interest. For muffins, they were pretty moist although I think I'd still enjoy them more with a big glass of milk or maybe a nice mug of tea. They are a great festive breakfast/brunch item so try them this week for a Thanksgiving treat!

Thursday, November 19, 2009

Mac & Cheese Magic

Florentine Mac and Cheese and Roast Chicken Sausage Meatballs
from Rachael Ray
1 lb cavatappi (hollow, corkscrew-shaped pasta)
1 1/2 lb ground chicken
2 to 3 fresh rosemary sprigs, stripped and finely chopped
2 tsp fennel seeds
3 garlic cloves, grated
1 tsp red pepper flakes
1 cup ricotta cheese
1 1/2 cup grated Parmigiano-Reggiano cheese
1 egg
1/2 to 3/4 cup bread crumbs
3 Tbsp olive oil
3 Tbsp butter
2 Tbsp all-purpose flour
1 cup chicken stock
1 cup whole milk
1/8 tsp grated nutmeg
2 (10 oz) boxes of chopped frozen spinach, defrosted

  1. Preheat the oven to 450F.
  2. Place a large pot of water on to boil. When it comes to a boil, salt it, add the pasta, and cook al dente.
  3. While the water is coming to a boil, in a large mixing bowl combine the chicken, salt and pepper, rosemary, fennel seeds, garlic, red pepper flakes, ricotta cheese, 1/2 cup Parmigiano, the egg, and the bread crumbs. If the mixture is too wet, add another handful of bread crumbs. Form 8 large balls, 3 to 4 inches in diameter. Coat the balls in a couple of tablespoons of olive oil and lightly grease a rimmed baked sheet with another tablespoon of the olive oil. Arrange the balls on the sheet and roast for 17 to 18 minutes, or until the juices run clear.
  4. While the meatballs roast, melt the butter in a medium saucepot over medium heat. Whisk in the flour, cook for 1 minute, then whisk in the stock and milk. Season with salt, pepper, and nutmeg and cook for 5 to 6 minutes to thicken. Stir in the remaining cup of grated Parmigiano and reduce the heat to the lowest setting.
  5. Add the spinach to the white sauce, separating the clumps as you go. Mix thoroughly.
  6. Drain the pasta and place in a large bowl. Pour the spinach sauce over the pasta and toss to combine. Adjust the seasonings.
  7. Serve the Florentine Mac and Cheese topped with 2 meatballs per serving.
If you know our family very well than you probably know about our love of macaroni and cheese. My husband pretty much tried to live off the stuff in college and has made quite the effort to kept it in our diet on a regular basis. What can I say? He's a man who likes simple things. Therefore I was pretty excited to find a healthier version.

The ingredients:

All the ingredients for the meatballs. I've never put ricotta cheese in meatballs before but it goes well. It makes the meatballs super sticky but the olive oil seems to help with that.

These meatballs are ginormous!!

Even after they are cooked, they are large, large, large. They kind of look like really puffy scones or biscuits.

I once again steamed fresh spinach instead of defrosting frozen (like I did with the Turkey Meatball Hoagies).

This is the same sauce base as the sauce for the Hoagies but it calls for a ton of spinach. I had to steam the spinach in two batches and the sauce looked like it should have enough after only half. If you like spinach though, this is the sauce for you.

I couldn't find cavatappi so I used gemelli instead. It worked well and even had the hollow corkscrew shape!

Lots of pasta and lots of sauce.

The final product: Mmm... mac and cheese. We enjoyed this quite a bit. It is creamy and wonderful with a subtle cheesy flare. My husband felt the sauce was little heavy on the spinach. While I liked it the way it was, I think you could probably cut a quarter to even half of the spinach out of the sauce and not miss in the final product. The chicken sausage are really quite extraordinary. I think what makes the meatballs special is the ricotta cheese; it makes them really moist and oh so yummy. The two meatballs per serving recommended in the recipe would definitely be a bit much (even with just one you still get a quarter pound of meat!) although I don't think I would cut down the size of the meatballs as the size adds a novelty to the meal. This will definitely be added to our "regulars".

Thursday, November 12, 2009

More Pumpkin

Pumpkin Bread
3 cups sugar
1 cup cooking oil
4 eggs
3 1/3 cups all-purpose flour
2 tsp baking soda
1 1/2 tsp salt
1 tsp ground cinnamon
1 tsp ground nutmeg
2/3 cup water
1 15-oz can pumpkin
  1. Grease the bottom and 1/2 inch up the sides of two 9x5x3-inch or three 8x4x2-inch loaf pans; set aside. In a very large mixing bowl beat sugar and oil with an electric mixer on medium speed. Add eggs and beat well; set aside.
  2. In a large bowl combine flour, baking soda, salt, cinnamon, and nutmeg. Alternately add flour mixture and water to sugar mixture, beating on low speed after each addition just until combined. Beat in pumpkin. Spoon batter into prepared pans.
  3. Bake in a 350F oven for 55 to 65 minutes or until a wooden toothpick inserted near centers comes out clean. Cool in pans on wire racks for 10 minutes. Remove from pans. Cool completely on wire racks. Wrap and store overnight before slicing.

Makes 2 loaves.

Mmmm... pumpkin bread. Okay, I don't actually remember eating pumpkin bread before but I love pumpkin and I love sweet breads so we can assume I'll like pumpkin bread. This is a recipe I found in my trusty Better Homes and Gardens cookbook. BH&G, you've been so good to me.

The ingredients:

The leaves fell off the trees right outside our kitchen window so instead of having 10-20 minutes of direct sunlight in my kitchen a day, I have hours. It's wonderful. This is my only explanation for the overabundance of pictures with this post... I was just loving the lighting.

The dry ingredients.


The oil, sugar and eggs. The sugar and oil looked so pretty in the sunlight.

Adding the dry ingredients to the sugar.

Mmmm... pumpkin.

Pumpkin swirl.

Finished batter.

I halved the recipe but I didn't really know what to do about the loaf pan. I'm thinking that my loaf pan (the only one I have) is a 8x4x2-inch pan. I didn't actually measure the pan (the pan just tells me it's a 1.5 lb) but judging by how full the pan ended up being, that's my best guess.

Luckily the too-small pan wasn't a disaster. I was a little worried when I checked on it at 55 minutes and the edges were done but the center was huge and very soggy. I kept checking on it every 5 minutes after that and pulled it out after 75 minutes.

The finished product: this bread is good. I mean really good. It's super moist and sweet and oh so wonderful. This recipe gets a gold star from me.